A high quality instrument bridge should last for decades, standing straight and tall, with no warpage, even with daily use. So it is truly upsetting to find that many musicians let their new bridges begin to warp within months. With this article I hope to show you how to preserve your bridge, how to obtain instant tuning stability, and how to get almost any set of strings you install to sound much better. Much of this is common sense, but some of these suggestions are “true secrets”, in that even most professional players are not aware of them.
1. Always change one string at a time, in order to preserve the proper location of the bridge, and to avoid having the sound-post fall over. This would be a good time to lubricate your fine tuners using a little paraffin or petroleum jelly. Having a tube of lip-balm in your case for this purpose makes a lot of sense.
2. Before installing the new string, remove the peg and rub a little peg lubricant on the shiny bearing surfaces. This is a must for easy, care-free tuning. Every musician should have a tube of peg lubricant (peg dope) in the case. Less convenient, but equally effective, is the use of a combination of dry soap, chalk, graphite (pencil), and sometimes rosin dust.
3. Before installing the new string, rub the point of a soft #1 pencil in the groove of the ebony nut, as well as in the corresponding groove in the bridge. The graphite acts as a lubricant. This is a very important step!
4. When installing the new string, start at the peg-end, not with the tail-piece end. This helps insure that the string will not be twisted.
5. With the peg in place, be sure that the hole for the string is located near the center of the peg-box, or slightly closer to the “head” of the peg. If the hole is located very close to either side of the peg-box, you must take your instrument to a luthier to have a new hole drilled in the correct location.
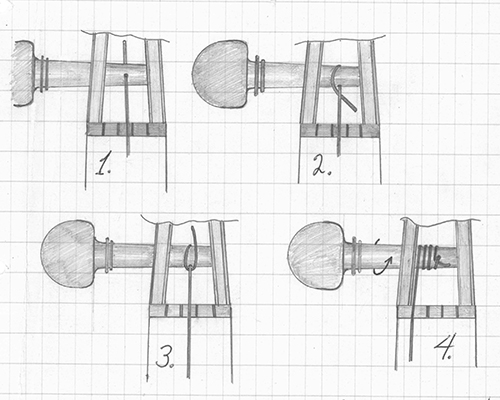
6. Insert the string through the hole with at least 1/4” protruding from the other side. The easiest way to lock the string in place is to wind the string over itself. For example, with a violin E or A string, you would first wind the string two full turns, guiding the string to the left of the first string turn, and then guiding it back across the string to the right. (see diagram) Continue to wind the string until the length is short enough that the other end of the string can be tucked through the hole in the tailpiece (or onto a fine-tuner) without releasing the tension on the string at the pegbox. Turn the peg further until the pitch just begins to be raised. At this point, straighten the bridge, as it will most likely have pulled slightly forward. Never wind the string tight against the inner pegbox wall. This can cause the peg to bind, and could even cause a crack in the scroll of your instrument.
7. Repeat the first six steps for each of the other three strings. Be certain to straighten a leaning bridge immediately and frequently during the tuning process, since a bridge that suddenly falls forward can cause great damage.
8. Now, begin to raise the pitch of each string in small increments, followed by the straightening of the bridge. It is easy to pull a leaning bridge back into the correct position because of the pencil graphite that you have rubbed into each notch. From the scroll-end of the violin (viola, cello) you can sight down the edges of the fingerboard to make sure the bridge hash’t shifted to one side or the other. Keep raising the string pitches and straightening the bridge over and over again until the desired pitches have been reached. This may be done by ear, but usually a tuning fork, piano, or electronic tuner will be required to insure proper tuning. Never tune the string more than a half-step above the desired final pitch. It is very easy to break a brand new string by slightly over-tightening it.
9. Many people would stop after step eight. However it is critical to continue with the next steps for optimal sound and pitch stability. One of the worst things a string player can do is to install new strings and then put the instrument away immediately. This can result in “wire-loose strings”, meaning that the winding becomes so loose that the winding moves around without gripping the core at all. These strings sound terrible, and must be thrown away, even if brand new. Most strings used today have a synthetic core wound with aluminum, silver, or tungsten. These strings are carefully made on special string-winding machines at the factory that tightly wind the metal wire over the tightly stretched core. However, the winding job is never perfect, and there are always gaps, irregularities and places where the winding is not gripping the core well. Most musicians have noticed that their instruments sound better after the new strings have been played in for a few days. During this “play-in” process the winding begins to grip the core more and more tightly, and ends up sounding richer and fuller. However, this process is inefficient, takes days, and is not totally effective. A much better process is manual manipulation of the new strings to achieve immediate tonal stability, richer sound, and insurance of longer string life, all within 5 minutes. There is really no excuse for any musician to say “I can’t change my strings today because I have a recital this weekend.”
10. This is the process: (The only tool needed is a small microfiber cloth such as you would use to clean off your instrument) Start with any string you wish. (There is no need to work on an e-string) Place the microfiber cloth over your dominant hand, and grasp the string above the bridge through the cloth with your thumb and forefinger. The string manipulation involves rubbing the string back and forth from bridge to nut with enough pressure that the string becomes physically hot. At the same time you are rubbing the string, you are also creating a slight “S curve” in the string by placing your thumb about one inch in front of your forefinger. So you are rubbing the entire length of the string vigorously while at the same time creating ‘drag” by forming an s curve with your thumb and first finger, which rapidly heats up the string and causes the winding to grip and adhere better to the core. The cloth is needed, because of the high heat produced. I would recommend this cadence: Pinch the string and rub the string vigorously 8 times up and down with your fingers twisting the string to the right, followed by 8 times up and down while twisting the string to the left. Repeat this pattern again several more times. When you pluck the strings you will find that they have gone down in pitch by at least a whole step. Tune the violin again and straighten the bridge. Do the whole string manipulation thing again, and you will hear that the strings now have gone out of tune by less than a half step. Tune. Straighten. Repeat for a third time. Now the violin has barely gone out of tune at all. If you were to repeat this a fourth time, your instrument would be “concert ready.” You will have achieved more in three minutes than you would have by “playing in” the strings for a week. You could perform a recital right now, and your instrument would scarcely be out of tune after 30 minutes of playing. Not only is the instrument now pitch-stable, but it also sounds fuller and richer than it did a few minutes earlier.
11. I take no personal credit for this technique, as it has been fully discussed by representatives of major string companies. In particular, I would like to thank Chris Rohrecker of Connolly Music Company, who represents Thomastik-Infeld strings in the United States for bringing this technique to my attention years ago. The first obvious value of this technique is to make strings immediately pitch-stable. However, I have been even more impressed by the sound improvements this usually brings about, often yielding better results than a sound-post adjustment.
~Thomas Metzler, Metzler Violin Shop